The Most Comprehensive Guide to Setup a Blogger (Blogspot) blog with Custom Domain and Cloudflare CDN

So setting up your own blog does not cost a dime, and you can keep it as long as you like. One of my blogs which I completely forgotten about, is still going strong after 7 years! I recently applied a new blogger theme to it, and it looks just like new! In case you're interested, its a blog about Shayari (poetry).
So, you have finally decided to create your own blog. That's good news!
However, be aware that having your blog on a custom domain increases its credibility and ranking. Also, keep in mind that Facebook, which is the world's biggest social networking giant, does not allow you to post links for blogger blogposts.
What to do in this case? Its simple really. There is no need to pay for costly hosting services if you just want a trial of your idea, or its not going to be a business website, hobbies should be free (or really easy on the pockets) right!
You can still continue to create your posts on the awesome blogger platform, the only thing you need to do is to purchase a domain name and point it to your blogspot blog. Your professional looking and sounding blog just enabled itself to be posted on Facebook! Awesome right?
You can choose from a variety of registrars. We personally use Namesilo for computengine.com.
We found it to be reliable and the renewal costs are same, which don't pinch your pockets, unlike some big names which lure you with cheap onboarding but really pinch later on.
You can search for your favorite domain name, and see the pricing details on the links provided.
We earn a small affiliate commission if you go ahead and make a purchase from Namesilo.com

So, once you've finally decided to purchase a domain name (or if you already own one), next step is to update your domain name details to blogger.
Let's see how it is done.
In your blog admin page, click on Settings.
Scroll down to the section called Publishing
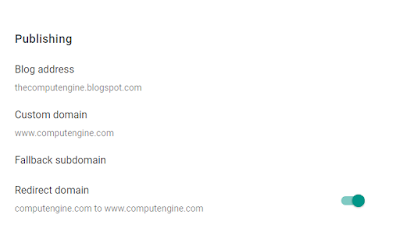
As you can see, we have filled www.computengine.com in the custom domain. You need to fill your domain name here. Click on the Custom Domain to do that.
When you fill your domain name, you need to verify to Google that you own the domain. Notice the text in the red error. Copy and save that text and we'll make use of it in our next steps. Don't use the text from the screenshot!

Now, the next step is, to configure your DNS settings in Namesilo (or any registrar you have purchased your domain from).
We need to create A records and CNAME records. A good reference from Google itself is this post.
In A records, pls put the IP addresses which are mentioned in the Google post.
The CNAME records will contain the values which were displayed to you in the red error message.
Once configured, it should look something like this:


One more final fine tuning is required. Go to blogger settings, and ensure that https availability is turned off. This is an important setting, as we are already using HTTPS on cloudflare and if this is turned on, it will lead to clashes.


Thanks for Reading the Article. If you have reached this far, we hope that the article was useful to you! Please Like/Share/Follow us on Facebook, Twitter, Tumblr.


Comments
Post a Comment